Build a Wooden Virtual Reality Headset
by Marin Begic
Although technology only gets more expensive with time, some gadgets become paradoxically more accessible. Virtual Reality headsets are among those gadgets that you can do at home, with a low budget and a strong will to create.
Because cardboard VR headsets have become highly popular in the past year, we have decided to go a step further a make a wooden one instead. Those with a passion for wood will find this project irresistible, especially because the final artefact is but a door to a different world.
For those who are interested, you can find a step-by-step tutorial and a visual guide below!
What you'll need...
- A 11 ½ x 8 ¼ inch (300mm x 210mm) piece of wood
- A pair of 45mm focal length biconvex lenses
- A 5 ½ x 1 inch (140mm x 25mm) strip of Velcro, mid-strength
- A 3 x 5 ¼ inch 7,5cm x 14cm strip of material that will keep your smartphone from falling. This can be a leather-like or stretching fabric
- Wooden Glue
- Mounting Putty
Tools...
The necessary tools will depend on what you already have in your workshop and how you like your woodworking. All the pieces can be cut with a handsaw if you trust your skills.
- Hand saw
- Clamps
- Marking knife
- Sandpaper
- Tape measure/rulers
- Drill with a round cutter the size of the lenses you got
About the wood...
The type of wood that's best for this project depends solely on what you want to use and what you'd like your Virtual Reality headset to be made of. An important aspect is the width of the board, which should be at least ¼-inch thick. It can be slightly thicker, if you want to achieve a sturdier look.
About the lenses...
The lenses have to be biconvex as simple convex will not do the job. The pair can be either 25mm in diameter, known as GC 1.0, or 37mm/GC 2.0. They can be bought on eBay or Amazon, or even in toy stores. They are normally used for kid's binoculars.
25mm lenses are cheaper than 37mm ones. If you buy them online, they can cost up to $8 unless you get them from afar (i.e. China), which can lower the price down to one buck, but extend the shipping time to a month.
Keep in mind that the holes you'll be making will depend on the diameter of the lenses so you might have to adapt these measurements. For this tutorial, we have used 25mm lenses.
Step-By-Step Guide
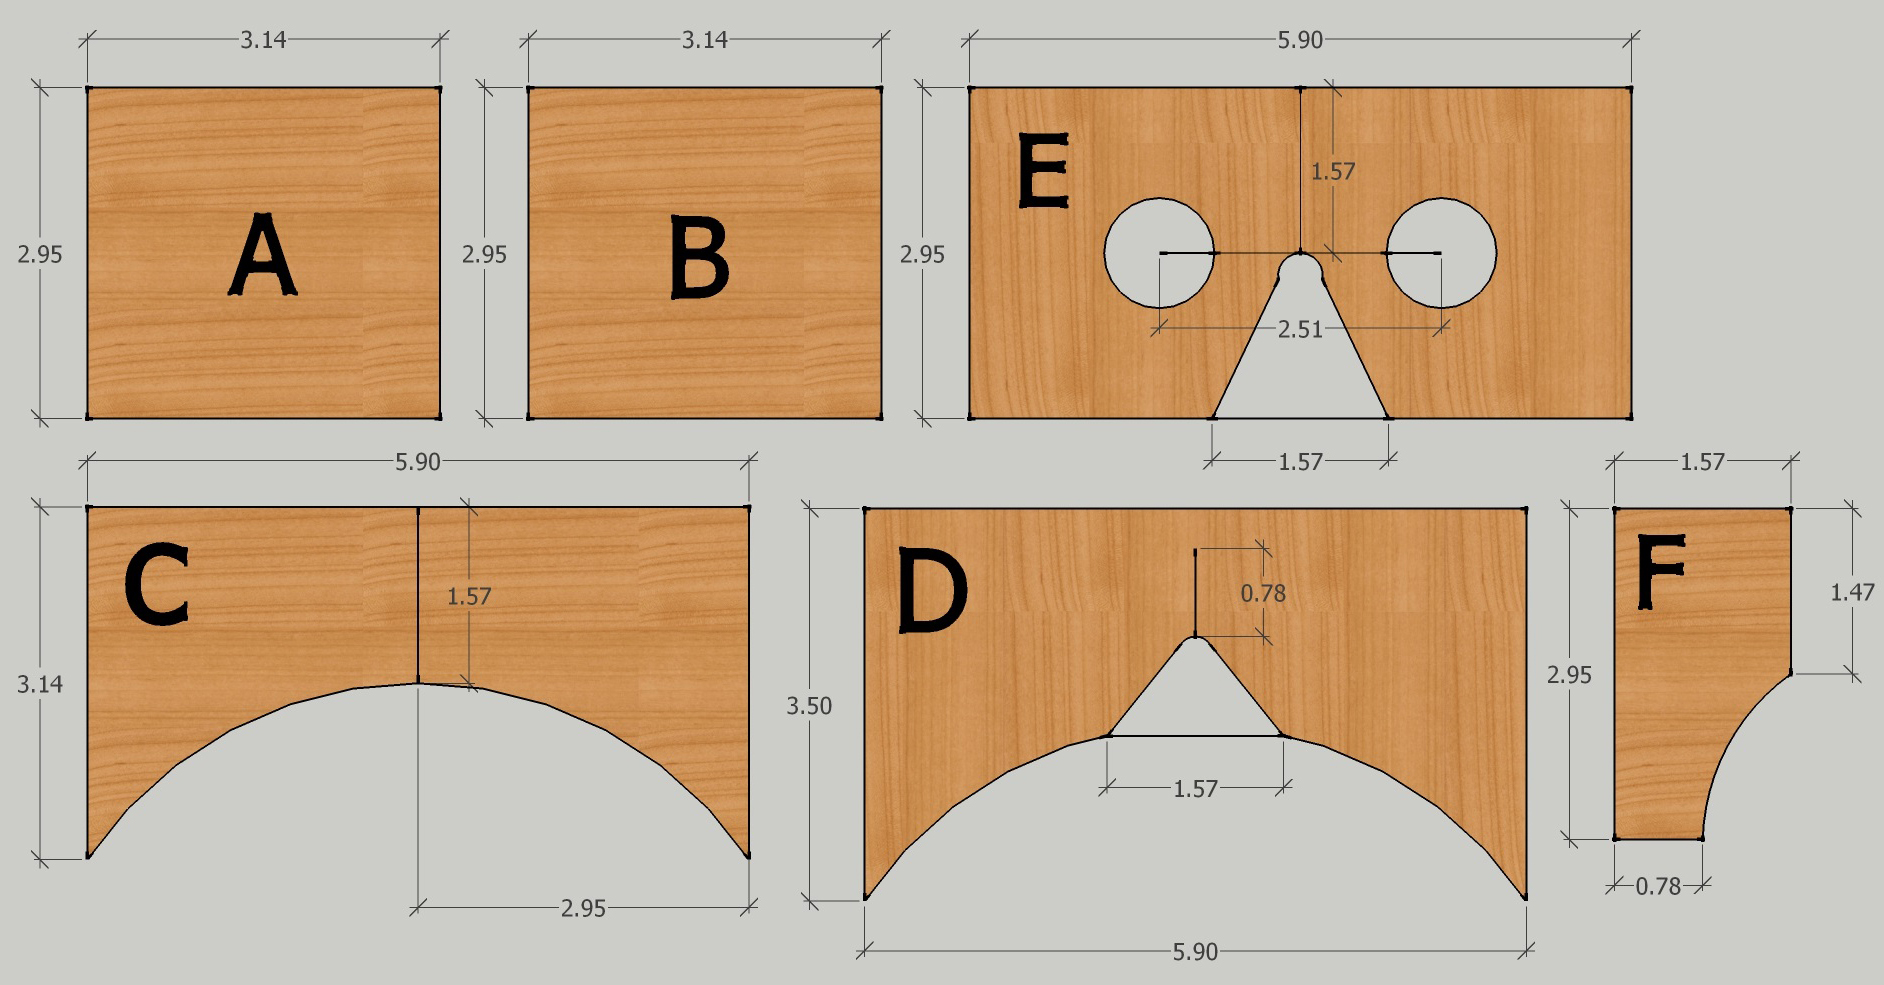
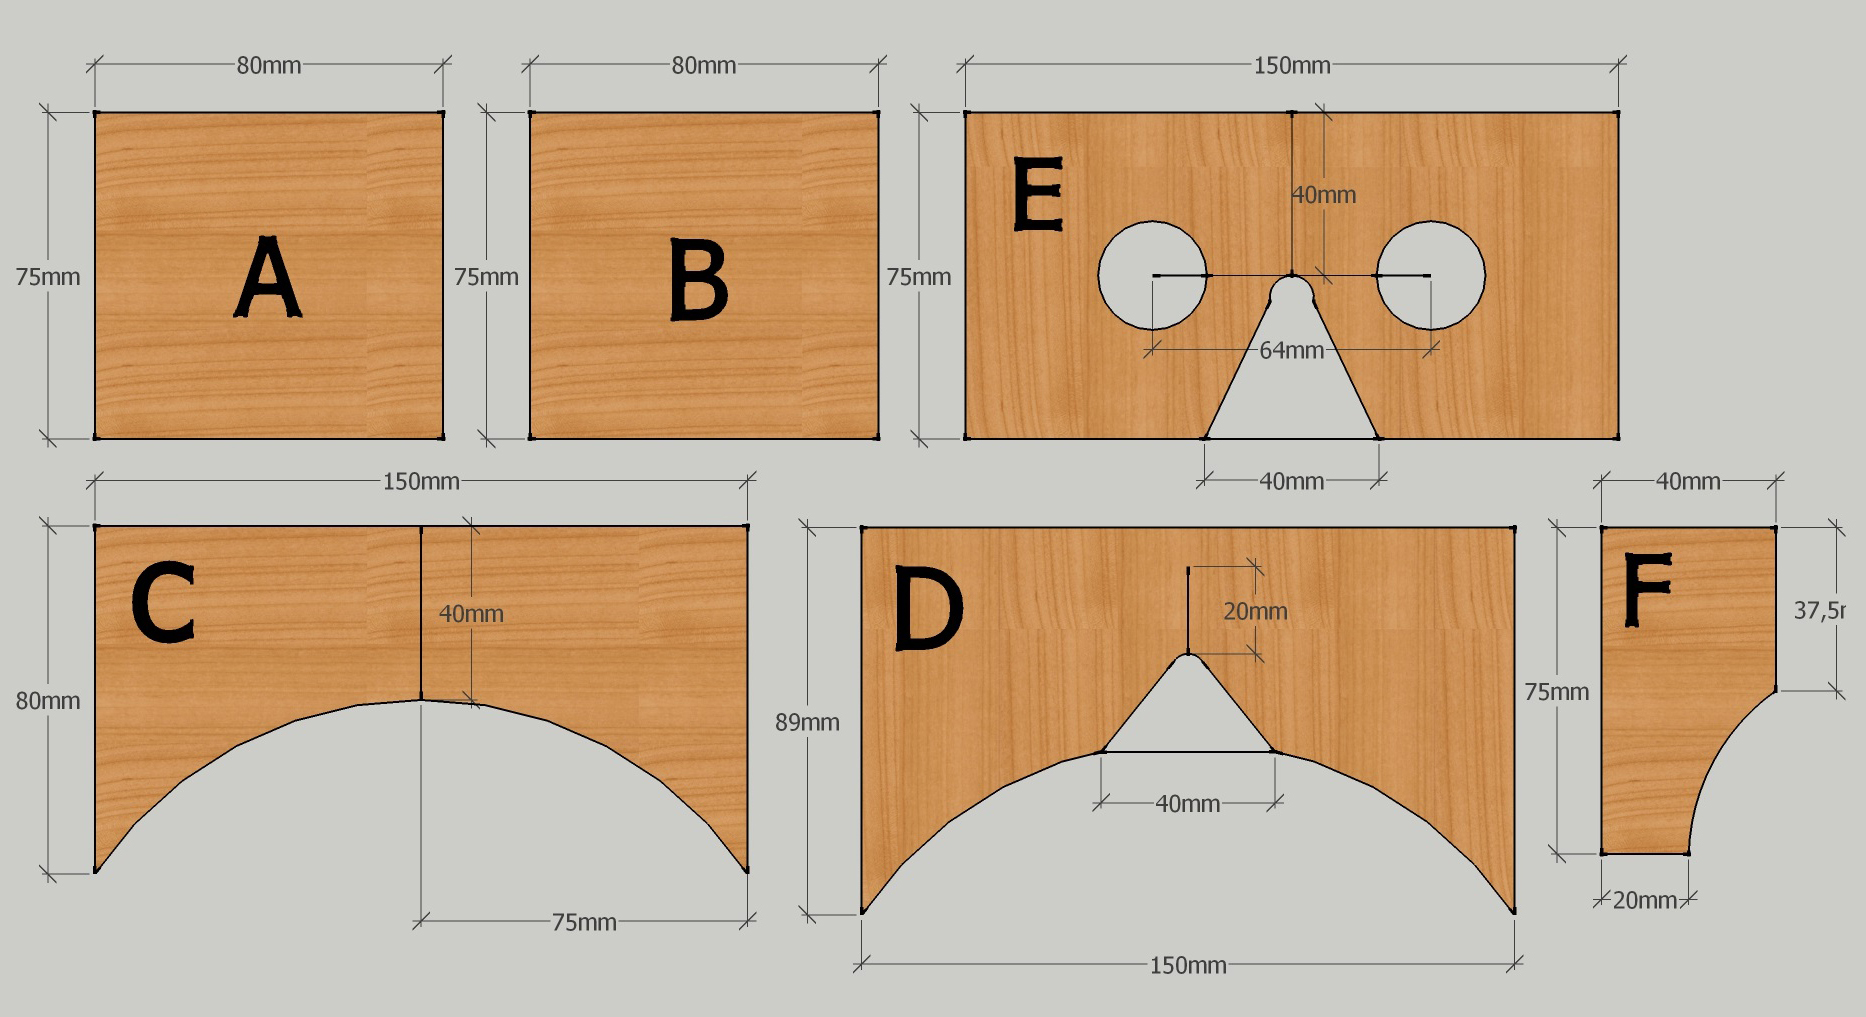
Once you have gathered everything you need, you are ready to start building your own wooden VR headset. We will refer to the 6 wooden pieces from letters A to F, so to help you picture the pieces and measurements, we have made a visual guide that you can check anytime throughout the process.
Click here for metric version of this graphic
- Pieces A to D
Cut pieces A and B. These will be two almost-squares of 3,14 x 2,95 inches (80mm x 75mm).
Cut piece C, which is a 5,90 x 3,14-inch (150mm x 80mm) rectangle. This rectangle will have an arc of half its height to shape the headset around your forehead. To do this, you have to find the middle point of the rectangle and trace a rounded line that goes from the bottom left corner to the bottom right corner, touching this middle point.
To cut this arc, you can either do it with the hand saw use a wood cutter, if you have one.
Cut piece D, which is a 5,90 x 3,50-inch (150mm x 89mm) rectangle. This piece is slightly bigger than the upper one because it will be the platform where your phone will rest, secured in place by the leather strip. This piece will need to have the same arc as the upper one. In addition to that, it will also need to give space to your nose.
First, you will make the same round cut from one corner to the other, passing through the middle point of the wooden piece; after that, you will have to mark a point with the knife 0.78 inches (20mm) above the highest point of the arc.
Then, leaving a 1,57-inch (40mm) gap for your nose, you will also make an arc, which you will then cut. See the visual guide for reference. - Pieces E and F
To make piece E, cut a rectangle that will be 5,90 x 2,95-inch (150mm x 75mm) minus two times the width of your wood in both height and length. If you are using ¼-inch wood, your formula would be: 5,90 – ½-inch x 2,95 – ½-inch (150mcm – 12,7mm x 75mcm – 12,7mm). This is so that it will fit inside the box that makes up the headset.
For the lenses' holes, find the middle point of the rectangle and leave a 2,50-inch gap between the center of both circumferences (see the visual guide to leave no doubts). Mark the holes and drill them with the correct bit.
From the middle point you already marked, trace a line down to the bottom and add 0.78 inches (20mm) on each side. Make an arc from these marks to the middle point, this is also a hole for your nose; cut this arc.
To put the lenses in place, use a very thin thread of mounting putty and place it around the lenses' holes. Insert the lenses and try to hide the mounting material as much as you can.
To make piece F, cut a small rectangle of 1,57 x 2,95 inches (40mm x 75mm). Then, from the middle point of its height and to the middle point of its length, make a nose-shaped arc; cut this arc. - Joints and Assembly
After you have your six pieces, you have to sand the edges and surfaces for a perfect finish.
You want your VR headset to be a small box, which is why pieces A to D need to have joints where they meet. If you have already worked with wood before, this is a very easy step and you may choose from the joint type you most like.
Piece C goes in the bottom, with the arc facing towards you. Pieces A and B go on the sides, with their height being the 2,95-inch (75mm) side. Piece D goes on the top, facing the same direction as piece C.
Piece E goes exactly where the arcs of pieces C and D begin; you can also measure it by putting it exactly in the middle of the headset's sides (A and B). This piece needs to be glued in place (remove the top of the headset before), as well as piece F, which will be placed with the arc facing down, in the middle of both pieces D and F.
Once you have these glued, you can put piece C on the top. Select one of the sides of the headset and place a Velcro piece of 2.75 x 1-inch (70mm x 25mm) on the top and one on the external bottom.
Paste the other side of the Velcro on the ends on the leather strip and it's done!
Try it out!
Download a Virtual Reality App on your smartphone, put the mobile in place, hold it with the strip and get immersed in a 3D world through the lenses of your new wooden VR headset!